Why Beat Markers Make Cutting Faster
With snapping on, a clip's edge jumps to the nearest marker. Put a marker on every beat and every cut you drag lands on the beat without zooming in on the waveform. Markers on the first beat of each bar are just as useful for slower edits: one cut per bar, or a new shot every two bars.
Your editor won't place them for you. Premiere Pro, DaVinci Resolve and After Effects have no built-in beat detection, so you either tap them in or bring them in from a file.
The Manual Way: Tap Along
Premiere Pro
- Put the song on the timeline and play it.
- Press
Mon every beat. Premiere drops a marker at the playhead each time. - Zoom in on the waveform and drag any marker that landed early or late onto the transient.
- Turn on snapping (
S) and cut.
DaVinci Resolve
- Play the timeline and press
Mon every beat to add timeline markers. - Fix the stragglers against the waveform.
- Turn on snapping (
N) and cut.
After Effects
- Select the audio layer and preview the comp with sound.
- Press
*on the numeric keypad on every beat to add layer markers. - Nudge the misses, then use the markers to time your keyframes and layer cuts.
Where Tapping Breaks Down
- It takes the whole song, every time. A 3-minute track at 120 BPM is about 360 beats. You tap through it, then go back and fix it.
- Your taps drift. Everyone hits a little early or late, and a marker one frame off is a cut that feels off.
- The markers don't say where you are. Marker 137 tells you nothing. Bar 35, beat 1 tells you the drop starts here.
- New project, new song, start again.
The Shortcut: Export Beat Markers, Free
Onset Engine detects every beat and bar start in a song and writes them out as markers your editor imports. It's free in the demo - no purchase, no watermark on the markers.
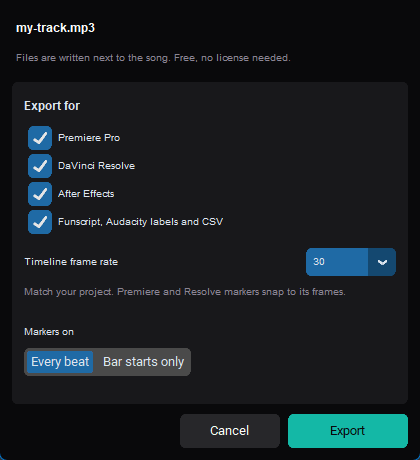
- Add your song in the AUDIO tab and click ⇩ BEATS.
- Choose your editor - Premiere Pro, DaVinci Resolve, After Effects, or all three.
- Set your timeline's frame rate (23.976 to 60) so each marker sits on the right frame, and pick Every beat or Bar starts only.
- Import:
- Premiere Pro - File → Import the
.xml. It opens as a sequence with your song and a marker on every beat. - DaVinci Resolve - File → Import → Timeline the same
.xml. It opens as a timeline with your song and its markers. - After Effects - select the song's layer, then File → Scripts → Run Script File and pick the
.jsx. One Undo removes them all.
- Premiere Pro - File → Import the
Every marker is named by bar and beat - 12.3 is the third beat of bar 12 - so you can read the song's structure straight off the timeline.
Tips for Cutting to Markers
- Match the frame rate. Markers snap to whole frames, so export at the rate of the timeline you'll cut on.
- Pick the density for the pace. Bar starts suit slow, cinematic edits; every beat suits fast montages where cuts land on the kick.
- Cut on the bar start, accent on the beat. Changing shots on the first beat of a bar and using the in-between beats for punch-ins, flashes or speed ramps reads as intentional rather than busy.
- Long mixes are fine. An hour-long DJ mix exports thousands of markers in one go.
When You'd Rather Not Cut by Hand
Markers speed up a hand-made edit. If you'd rather start from a finished cut, Onset Engine can build the whole beat-synced edit from your clip library: it analyzes what's in each clip, matches calm shots to quiet passages and high-motion shots to the drop, and cuts on the beat. Render it directly, or on Studio export it as an .otio timeline to finish in Premiere or Resolve. See how to sync video clips to music automatically.
Onset Engine runs on Windows. The marker files are plain files, so you can carry them to a Mac too; Premiere will ask you to locate the song.